Mittwoch, 29. Januar 2014

Documenting Shell Scripts

Intro

I recently was involved in the development of a rather large library of shell script functions. Although I'm aware that one should pick proper scripting languages for more complex programing task ( like Python, Perl, Ruby...) - sometimes you simply don't have a choice.

Abusing Doxygen

On issue was to find a way to generate an API like documentation straight out of the shell script code. Searching the Internet I mostly found obscure ways of using (not saying abusing) Doxygen for that task (here and here). For me that sounded too complex and confusing - I was only trying to add some comments with markup which eventually would turn into some HTML documentation file.

Plain Old Documentation In Shell Script

After a while I found this idea of Milivoj who is using the well proven Plain Old Documentation (POD) markup for documenting shell scripts. POD is the markup used in the Perl world for source code documentation.
Milivoj is utilizing HERE documents to embed POD markup in shell script which is in my opinion as close as you can get to the original Perl way. However, I decided for a simpler, at the same time more shell like approach on embedding POD code.

The POD format

This is an example of a file containing POD markup:
=head1 Important heading

This is inside the important heading section. 

  this is example code inside important heading.

=heading1 Another important heading

This is another important heading content.

=head2 This is a sub heading

This is the content of the subheading.

POD2HTML

Running the following command the POD markup is converted into a HTML page:
cat pod_example.pod | pod2html > pod_example.html
The tool which performs the magic is pod2html which is part of the standard Perl distribution. See the manual page for more details. However, I was more than  happy with the defaults:

Example HTML page, generated from a POD file using pod2html


Embedding Into Shell Script

The next step was to include the POD markup somehow in the shell script library. The Perl way of including POD markup into source code is by simply starting with a "=" tag (like =head1 ...) and closing a documentation section with the special tag =cut. After this last tag normal Perl code starts again. Since the Perl interpreter is aware of the "=" tags POD code can be directly inserted into the source.

Unfortunately, the shell interpreter ( in my case bash and ksh are possible) does not know about "=" tags so I needed to look for a different way to embed POD code in shell script. As already mentioned, Milivoj's approach is to use HERE documents to mimic the Perl embedding of POD markup which I felt is smart but hard to read in a large code base.

After thinking for a while I came up with a less smart but more readable solution (as always, in my opinion ;-) ). Here is an example how I use POD markup inside the shell script library:
## =head1 Intro
##
## This is a library with useful shell script functions.
##
## =head1 Functions
##
## This section contains the functions available.
##
## =head2 firstFunction "an argument"
## 
##  # example usage
##  firstFunction "some argument"
##
## This is the first function which accepts one argument.
##
firstFunction() {
    typeset arg1=$1
    ...
}

## =head2 secondFunction "an argument"
##
##  #example again
##  secondFunction "argument"
##
## Also the second function is important.
##
secondFunction() {
    typeset arg1=$1   
    ...
}

# i still can write normal, non-double hash comments
...
The double-hash comments are reserved for POD markup, normal, single hash comments keep their original purpose. I prefer this style of embedding over the HERE document variant since (as with e.g. Javadoc) documentation consists only of specially formated comments, nothing else.

To convert the shell script into an HTML documentation the command line is now slightly longer:
cat pod_example.sh | egrep '^##' | sed 's/^##\s\?//g' | \
pod2html > pod_example.html
egrep is used to only filter out POD markup lines (beginning with double hash), sed is then removing the double hash and if existing the following white space. The result is plain POD which is directly fed into pod2html.

The result is as nice as always:

Example HTML, this time generated out of POD markup inside a shell script

Samstag, 11. Januar 2014

Poor man's error handling with goto

I quite often deal with code which is build up on C functions which return the functions status as an integer. That way a parent function can check if its child function calls returned an error. The parent function then returns either "0" if everything ran well or otherwise any other number than "0". With this design you can build a call stack which gives the user (some logging provided) an idea where an error had happen.

This is a simple example:
// in some header:
#define OK 0
#define NOT_OK 1

int doCalculations()
{
    int rc = 0;

    rc = calcSomething();

    if ( rc != OK )
    {
        printf("function calcSomething had an error.\n");
        return NOT_OK;
    }

    rc = calcSomethingElse();

    if ( rc != OK )
    {
        printf("function calcSomethingElse had an error.\n");
        return NOT_OK;
    }

    return OK;
}
The problem here is that it is hard to follow the flow of the business logic since error handling is happening on the same stage.  To gain better readability I started to split the business logic and the error handling inside the function using goto:
// in some header:
#define OK 0
#define NOT_OK 1

int doCalculations()
{
    int rc = 0;

    rc = calcSomething();
    if ( rc != OK ) goto error_calcSomething;

    rc = calcSomethingElse();
    if ( rc != OK ) goto error_calcSomethingElse;

    return OK;


// error handling    
error_calcSomething:
    printf("function calcSomething had an error.\n");
    return NOT_OK;

error_calcSomethingElse:
    printf("function calcSomethingElse had an error.\n");
    return NOT_OK;
}
Now the upper part of the function deals mostly with the business logic (you can't get rid of the return code checking totally), the lower part is purly used for error handling. This technique is quite popular, I also spotted it inside the Linux kernel sources.

To my defense I need to state: I only use the evil goto for that one purpose: error handling and freeing of locally allocated heap data - nothing else.

By the way: An alternative way to print a backtrace is provided by the glibc with the backtrace function. However, this is not part of the ANSI C standard - if this is important for you.

Montag, 30. Dezember 2013

PuTTY Backend Handling - A Virtual Functions Example - Part 2/2

This is the second and the last part about my digging of the PuTTY sources. The first part introduced the Backend interface which is used to provide all applications of the PuTTY suite (PuTTY terminal GUI, pscp, plink...)  with an abstratction of the communication protocol (ssh, telnet...) choosen by the user.

After looking  at the way PuTTY is organizing the backends available, this post concludes with an example of how the Backend interface is used in application code.

Collecting Backends


The available backends are bundled in an array of Backends which is later accessed by convenience functions to select the right Backend for a connection.
// file BE_ALL_S.C (all backends):

Backend *backends[] = {
    &ssh_backend,
    &telnet_backend,
    &rlogin_backend,
    &raw_backend,
    &serial_backend,
    NULL
}
Not all applications in the PuTTY suite require all backends. Hence, there are similar files (modules) to the BE_ALL_S.C module above with just a shorter list of available backends.

The following module BE_SSH.C only contains the Backend for SSH (used in plink and psftp):
// file BE_SSH.C (used in pscp, psftp)

Backend *backends[] = {
    &ssh_backend,
    NULL
}
Applications which let you choose between different backends are mainly using the convenience functions backend_from_proto:
Backend *backend_from_proto(int proto)
{
    Backend **p;
    for (p = backends; *p != NULL; p++)
        if ((*p)->protocol == proto)
         return *p;
    return NULL;
}
This functions takes in a protocol identifier number and then tries to find the right backend struct in an array of available backends (see BE_ALL_S.C and BE_SSH.C ).
For that purpose it is comparing the protocol identifier number with the identifier number configured as second last member of the backend structs. In our examples RAW.C and SSH.C as well as in all other modules which implement a certain protocol, the id number is not coded directly but as more reader friendly constants (e.g. PROT_RAW and PROT_SSH).

A last remark to backend_from_proto: The way the function iterates through the backends is a nice example of pointer arithmetic: Iterator p is declared as the same type as the backends array (remember, arrays are pointers in C). By setting it to the value of the backends array, is pointing to the first element of that array. Incrementing p by one skips over to the next element of the backends array. Since the array is NULL terminated it is easy to check whether or not p has reached the end of the array.

Using The Backend


Now only the actual usage of the Backend interface inside the application code is missing. The next lines of code are snippets from windows.c, the PuTTY main program:
// window.c - example of using the flexible backend
// in application code

static Backend *back;

...

back = backend_from_proto(conf_get_int(conf, CONF_protocol));

...

error = back->init(NULL, &backhandle, conf,
                   conf_get_str(conf, CONF_host),
                   conf_get_int(conf, CONF_port),
                   &realhost,
                   conf_get_int(conf, CONF_tcp_nodelay),
                   conf_get_int(conf, CONF_tcp_keepalives));

back->provide_logctx(backhandle, logctx);

...

Line 3 declares variable back as a pointer to a Backend implementation (well, actually struct as we've seen before). Line 7 let the magic happen: it takes the users selection (ssh, telnet...) and loads via function conf_get_int ( user selection to protocol id number) and eventually function backend_from_proto the right implementation of the communication protocol (see above for details).
In line 11 and 18 contain two examples for working with the backend functions. As can be seen, this is totally independent from the users selection. back->init(...) on line 11 will be processed for an ssh connection as well as a telnet connection (and all other protocols available for user selection).

Here we harvest the fruits of our effort (can one say that in English ?! ;-)  ): The logic of the application is completely decoupled from the actual implementation of the communication protocols.

window.c above is part of the well known Windows version of PuTTY. There is also a lesser known Linux version. There, the implementation of the application (the GUI) part differs from the Windows implementation. However, the Windows and the Linux version of PuTTY share exactelly the same implementation of the communication protocols (our Backends).


Here, our digging of the PuTTY sources ends. I have to admit, the structure and implementation the PuTTY author(s) chose to implement the communication protocols really impressed me - and is now also part of my own arsenal ;-) .

Freitag, 27. Dezember 2013

PuTTY Backend Handling - A Virtual Functions Example - Part 1/2

In one of my past posts I already wrote about more general insights while studing the PuTTY sources. One ill baby and some Chrismas preparations later I'm glad to post two articles about my clues looking at the code of some really experienced guys (well, it is mostly Simon Tatham - the main author of PuTTY).

I particuarly liked the way different applications of the PuTTY suite  (the well known PuTTY SSH GUI is just one amongst others, there is also plink, pscp ...) are sharing the implementation for certain communication protocols. The next screenshot shows where to select those protocols in the PuTTY SSH GUI:

Choosing between different connection protocols in the PuTTY GUI
In this post and the next one I want to show you how nicely the PuTTY authors share the implementation of those communication protocols amongst different tools of the PuTTY suite.

Overview


Before looking at the code lets have a look at this little sketch: (made with Asciiflow)
The implementation of the communication protocols is shared amongst all applications of the PuTTY suite 

This overview should assist you while continue reading. As can be seen, the central header file PUTTY.H contains the definition of the Backend interface.

Interfaces


Short stop: The term interface is widely used in object oriented languages but not so often when it comes to C. However, books like "C Programming: A Modern Approach" or "Test Driven Development for Embedded C" are heavly promoting (particuarly the latter one) the concept of an interface ( a C header file) and its implementation ( a C module). It's nice to see that an old school language like C already contained everything required for this recommendable programming approach.

Back to PuTTY and its sources. From a technical side the Backend interface is a struct mainly consisting out of function pointers. The name of the function pointers are the ones which will be later implemented by the single backend modules (RAW.C, TELNET.C, ...)
// file PUTTY.H

// Defining the backend interface:
struct backend_tag {
    const char *(*init) (void *frontend_handle, void **backend_handle,
    Conf *conf, char *host, int port, char **realhost,
    int nodelay, int keepalive);
    void (*free) (void *handle);
    /* back->reconfig() passes in a replacement configuration. */
    void (*reconfig) (void *handle, Conf *conf);
    /* back->send() returns the current amount of buffered data. */
    int (*send) (void *handle, char *buf, int len);
    /* back->sendbuffer() does the same thing but without attempting a send */
    int (*sendbuffer) (void *handle);
    void (*size) (void *handle, int width, int height);
    void (*special) (void *handle, Telnet_Special code);
    const struct telnet_special *(*get_specials) (void *handle);
    int (*connected) (void *handle);
    int (*exitcode) (void *handle);
    /* If back->sendok() returns FALSE, data sent to it from the frontend
     * may be lost. */
    int (*sendok) (void *handle);
    int (*ldisc) (void *handle, int);
    void (*provide_ldisc) (void *handle, void *ldisc);
    void (*provide_logctx) (void *handle, void *logctx);
    /*
     * back->unthrottle() tells the back end that the front end
     * buffer is clearing.
     */
    void (*unthrottle) (void *handle, int);
    int (*cfg_info) (void *handle);
    char *name;
    int protocol;
    int default_port;
};

// create the "Backend" data type for struct backend_tag"
typedef struct backend_tag Backend;
typedef for a struct is usually combined with the definition of the struct tag but can ( like here ) of course be written separately.

Interface Implementations


Now that we've seen the interface of the Backend lets have a look inside one of the Backend implementations. For simplicity I've chosen module RAW.C.

At the header of the module the raw_backend struct ( I don't dare writting  "object" ;-) ) is declared and initialized with the function names which actually implement the interface. The functions themself are living in the same module file:
// RAW.C - declaring and initializing the raw_backend struct 
// with the names  of the modul's functions which 
// implement the interface in PUTTY.H plus some default values.
...
Backend raw_backend = {
    raw_init,
    raw_free,
    raw_reconfig,
    raw_send,
    raw_sendbuffer,
    raw_size,
    raw_special,
    raw_get_specials,
    raw_connected,
    raw_exitcode,
    raw_sendok,
    raw_ldisc,
    raw_provide_ldisc,
    raw_provide_logctx,
    raw_unthrottle,
    raw_cfg_info,
    "raw",
    PROT_RAW,
    0
}
...
After publishing the names of the functions, the actual implementation follows in the same file, for demonstration, I just give you the stubs of the first two, raw_init and raw_free.
// RAW.C - local module functions (static) containing 
// the implementation of the Backend interface.

static const char *raw_init(void *frontend_handle, void **backend_handle,
       Conf *conf,
       char *host, int port, char **realhost, int nodelay,
       int keepalive)
{
   ...
}


static void raw_free(void *handle)
{
   ...
}
You might share my excitement ;-) when we look at the implementation of the next protocol. This time we're brave and browse through SSH.C, the implementation of interface Backend for the SSH protocol.

First, again the declaration and initialization of the Backend struct:
// SSH.C - the implementation of interface "Backend" 
// for the SSH protocol

Backend ssh_backend = {
    ssh_init,
    ssh_free,
    ssh_reconfig,
    ssh_send,
    ssh_sendbuffer,
    ssh_size,
    ssh_special,
    ssh_get_specials,
    ssh_connected,
    ssh_return_exitcode,
    ssh_sendok,
    ssh_ldisc,
    ssh_provide_ldisc,
    ssh_provide_logctx,
    ssh_unthrottle,
    ssh_cfg_info,
    "ssh",
    PROT_SSH,
    22
}
Again, the actual functions containing the implementation reside in the same file (just the stubs of the first two):
// SSH.C - private functions implementing 
// the interface "Backend"

static const char *ssh_init(void *frontend_handle, void **backend_handle,
       Conf *conf, char *host, int port, char **realhost,
       int nodelay, int keepalive)
{
    ...
}

static void ssh_free(void *handle)
{
    ...
}
Since I'm just interested in the mechanism of interface vs. implementation in C, I omitted the content of the functions - but did you see how the two modules RAW.C and SSH.C are following the same pattern - specified by (again) the interface PUTTY.H.

Now that there is the implementation of the protocols we need to investigate how the actual applications are using them. This is something for part two of this little series.

Donnerstag, 28. November 2013

I've learned the hard way - TDD in C, 2nd round

A while ago I wrote about how to insert "spy" code in C. That is the process of overwriting an existing function definition at link time with an own implementation to basically write unit tests.

After practicing for a while I have to admit that this approach works but is unpredictable and tricky to set it up. Unpredictable since I found it hard to guess in which exact order the linker is resolving the needed symbols (in this case function symbols), tricky when you're trying to get legacy code with many, sometimes depending libraries under test (which I currently do).

After some recent frustration I gave the search engine an other go and ended up with my new favorite toy: the --wrap option of ld, the GNU linker.

Here is what the man page of ld tells about it:
--wrap=symbol
    Use a wrapper function for symbol.  Any undefined reference 
    to symbol will be resolved to "__wrap_symbol".  Any undefined
    reference to "__real_symbol" will be resolved to symbol.

    This can be used to provide a wrapper for a system function.  
    The wrapper function should be called "__wrap_symbol".  
    If it wishes to call the system function, it should 
    call "__real_symbol".

    Here is a trivial example:

            void *
            __wrap_malloc (size_t c)
            {
              printf ("malloc called with %zu\n", c);
              return __real_malloc (c);
            }

    If you link other code with this file using --wrap malloc, 
    then all calls to "malloc" will call the function "__wrap_malloc" 
    instead.  The call to "__real_malloc" in "__wrap_malloc" will call 
    the real "malloc" function.

    You may wish to provide a "__real_malloc" function as well, so that 
    links without the --wrap option will succeed.  If you do this, you 
    should not put the definition of "__real_malloc" in the same file 
    as "__wrap_malloc"; if you do, the assembler may resolve the call 
    before the linker has a chance to wrap it to "malloc".

This functionality can of course also be used to overwrite some function which stands in our way for unit testing which I'm going to show you now.

I'm using the same test source as last time. Here are our example files:
// file fav_music.h
void tellFavoriteMusic( void );


// file program.c
#include "fav_music.h"

int main() {
   tellFavoriteMusic(); 
}


// file fav_music_indie.c
#include <stdio.h>

void tellFavoriteMusic() {
    printf("I like Indie!!!\n");
}


// file fav_music_soul.c
#include <stdio.h>

void __wrap_tellFavoriteMusic() {
    printf("I like Soul!!!\n");
}

Notice that the name of function tellFavoriteMusic in fav_music_soul.c has been changed to __wrap_tellFavoriteMusic.

When the three files are compiled and linked together (for clarity I keep this as two separate commands although gcc could do it in one go) as expected tellFavoriteMusic in fav_music_indie.c is executed by main():
$ gcc -c program.c fav_music_indie.c fav_music_soul.c
$ ls *.o
fav_music_indie.o  fav_music_soul.o  program.o
$ gcc -o program.out fav_music_indie.o fav_music_soul.o program.o
$./program.out
I like Indie!!!
This is something we actually expected: all function names are unique and the one specified is executed.

Now let the magic happen and tell the linker that it should replace a function call to tellFavoriteMusic with a call to __wrap_tellFavoriteMusic:
$ gcc -Wl,--wrap=tellFavoriteMusic -o program.out fav_music_indie.o fav_music_soul.o program.o
$ ./program.out
I like Soul!!!
program.c still calls tellFavoriteMusic, but this time its replacement __wrap_tellFavoriteMusic is called.

A note to the parameters syntax -Wl,--wrap=tellFavoriteMusic. Since we're calling the linker ld via the GNU compiler we need to tell gcc to pass the --wrap parameter through to the linker. Here is what the gcc manual says:
-Wl,option
    Pass option as an option to the linker.  If option contains 
    commas, it is split into multiple options at the commas.  
    You can use this syntax to pass an argument to the option.  
    For example, -Wl,-Map,output.map passes -Map output.map 
    to the linker.  When using the GNU linker, you can also 
    get the same effect with -Wl,-Map=output.map.
Although it looks similar -Wl is different to the common warning switch -W...

Other approaches
While browsing the Internet I stumbled  across some other approaches for  replacing a function with an other one at link time. My favorite ones use the tool objcopy which is part of the binutils and is used to change object files (the result of a compiler run).

Mark function to overwrite as "weak"
Here the idea is to use the ----weaken-symbol parameter of objcopy on the object file of the original function. By marking the function to replace as weak the linker should prefer a second function implementation with the same name which hasn't got that flag. The multiple definition error should not appear.

Temporary remove the original function definition from the object file
With this approach you generate a temporary object file which does not contain the conflicting original implementation of the function. I assume objcopy and/ or objdump could do that.

I haven't tried the last two ideas myself since I'm happy with the --wrap parameter solution. However, some of you might find those thoughts helpful as a starting point of own tests.

Montag, 18. November 2013

Multi line strings in C

I'm still trying to find some time to finish my second article about the Putty sources (first one is here).

In the meantime I want to share a helpful little trick on how to handle multi line strings in C with you. See this example:
//multi line strings and multi line printf examples
#include <stdio.h>

int main( void ) {

    // multi line string definition
    char* string1 = "i am "
                    "a multiline string "
                    "which the compiler assembles "
                    "to one sting. No need for "
                    "concatination.";

    printf( "An ordinary string on one line: %s\n", string1 );


    // multi line string inside printf
    char* string2 = "a string";

    printf( "Multiline string works also "
            "inside a printf command. "
            "This is helpful if the string part of "
            "the command is too long to fit your maximum "
            "collumn size. Of course you can use format "
            "specifier like %s.\n", string2 );
}
The output is:
An ordinary string on one line: i am a multiline string which the compiler assembles to one sting. No need for concatination.
Multiline string works also inside a printf command. This is helpful if the string part of the command is too long to fit your maximum collumn size. Of course you can use format specifier like a string.
The examples are (hopefully) self-explainatory. The first one simply defines a multi line string which will be printed on one line. The second example demonstrates that the printf family of commands also understands the multi line syntax. Neat, innit?

Dienstag, 8. Oktober 2013

Digging The PuTTY Sources

Since many years I'm a heavy user of the SSH client PuTTY. Some days back I had the idea to take a look at the PuTTY sources. Not that I wouldn't trust the software. It was pure curiosity to see how the software I've been using for such a long time, is actually created.

The Main PuTTY Configuration Screen On Windows
The sources can be downloaded from the web page. First of all I've noticed that PuTTY supports not only Windows (where I'm mainly on) but also Linux and Mac OS X (to some extend).

To be portable as much as possible PuTTY is written in pure ANSI C (C89/ C90). It is impressive on how many different compilers the sources obviously compile. The code itself is well structured and not too cryptic (beside some functions which I personally might have distributed into smaller ones).

Since we're on ANSI C there is no standard library support for wildcard matching (required for sftp). Hence, the PuTTY team went for an own implementation (see wildcard.c). I seriously hope that I've never have to implement something like this - praise to good library support ;-)

To auto generate the makefiles required for the different target environments PuTTY is utilizing a Perl program called mkfile.pl. This is a handcrafted solution of the PuTTY team, Cmake and automake would be popular open source tools for the same kind of task.

The PuTTY authors (it's actually mainly Simon Tatham) keep a clear separation between platform depended and independed code. I found the implementation very well done. There will by a separate blog post about the implementation of the different communication protocols the PuTTY suite is supporting (ssh, telnet, raw...).

Although I'm a big fan of the Test Driven Development approach, it's calming to see it is still possible to go without ;-) However, I did find some traces of where test data is generated. Also, cmdgen.c, a command line version of the SSH public/ private key generator PuTTYgen, contains some functionality to run external tests. That is taking the binary produced and call it with different arguments while testing for the result.

Also, the code comments are very well written.

The PuTTY Sources Contain Many Helpful Comments And Explainations

Conclusion: for gaining an inside in the work of a seasoned C programmer, the PuTTY source are more than worth spending some time and coffee.

Donnerstag, 19. September 2013

The C Module Pattern

Update Feb. 2015: As I've learned meanwhile this "thing" described below has an offical name. It is called "Abstract Data Type" and is nowedays the way one should design its C code. See "C Interfaces and Implementations: Techniques for Creating Reusable Software" for more on that.

I mentioned before that I am currently reading the book Test Driven Development for Embedded C. An unexpected but very welcome outcome of this study is a much clearer idea of how to structure C modules. Considering the amount of C code which is around in this world, it is astonishing that there apparently is no common pattern for this task.

The proposed approach by James Grenning, author of the book is close to what we consider as object oriented. However, it is far simpler than the GNOMEs gobject interpretation of OO.

The module pattern is all about clear separation of the modules to support loose coupling, predictable module and function names and standardized module constructors and destructores.

Their are two variations of the pattern, which build up on top of each other. The first one is the single instance module, which is presumably the most common one. If more than one instance of a module is required at the same time the multiple instance module variant is the one to choose. However, they don't differ that much.

Common Rules

Both variants have a couple of things in common.

Dependency Inversion Via Interfaces


This might sound odd in the world of C language but it has got all we need to follow the dependency inversion principle. There, a module is not directly depending on an other module but on its interface.

In C terms that is a client module which is only employing the functions and constants provided by the header file of the module used. The client doesn't care about the implementation of the function. It only relies on the header definition.

This is already common practice when we use libraries like stdlib - we don't care about the implementation of the functions offered in stdlib.h but we simply use them.


Information Hiding Inside The Module


To hide modul internal variables and functions inside the module they are marked with the C keyword static in front of them. Also, the declaration of private functions (forward declaration) takes place at the top of the module file, not inside the header. This thinking was new to me but makes much more sense: The interface/ header only contains the outside world communication of the module, nothing else.

Always Constructors And Destructors


This was also a new concept for me which I loved from the first minute. Users of the module always initialize the module with a Create function and cleanup module data later with a Destroy function.  Again this rule applies always, even if for the moment one of the functions has only a stub implementation.

What we gain here is a clear, predictable way of opening and closing the communication with the module.  Now it is much harder to forget to free data, since this is what usually the modules destructor will do for use.

Module And Function Naming


The following rules are simple and effective. Modules have a meaningful name, like Database.c which lets us assume that this module deals with the database. So far so good, as the next step the modules public functions use the name of the module as their prefix. Function GetOrderData() is so becoming Database_GetOrderData(). Using this notation it is easy to see where GetOrderData was implemented.

Remark One


This rule has a downside: If you try to give your functions meaningful names to prevent additional comments ( as you should do as a clean coder ) and you've got a lot of parameters (which is not good style anyway but unfortunately harder to get around in C as e.g. in Javascript with its instant JSON objects), then your functions signature might get quite long and is likely to break the 80 characters line width rule.

In that case I code the function onto multiple lines (see examples below). As I tend to be obsessed with clean, verbose code, I don't like that but I keep on following this rule anyway since in my opinion the clear structure I gain outweighs this downside.

Remark Two


Now it is getting slightly esoteric ;-) but since I strongly belief that code style matters lets take a closer look at the function names:

I usually prefer the Java style camel case notation where methods and functions start lower case whereas classes and interfaces begin with a capital letter. For our C function naming rule here there are two possible ways to go:
  • Database_getOrderData()
  • Database_GetOrderData()
The first one transfers the Java notation into our naming rule. However I decided to go for the latter one which I believe is a bit quicker to grasp when you read the code. This is also the proposed notation of James Grenning, author of Test Driven Development in Embedded C.

Single Instance Module

For this example there won't be an implementation, only the public interface (the header file) is presented.

// RecordCollection.h - Single Instance

#ifndef D_RecordCollection_H
#define D_RecordCollection_H

void RecordCollection_Create(); 
void RecordCollection_Add( const char* artist, const char* title ); 
void RecordCollection_PrintContainsArtist( const char* artist ); 
void RecordCollection_Destroy(); 

#endif  /* D_RecordCollection_H */

The module RecordCollection contains a constructor and a destructor function (RecordCollection_Create() and RecordCollectionDestroy()). Beside that there is a function to add a new record to the collection and one function to display whether or not an artist is present in the collection.

The interface does not reveal how RecordCollection is organized internally. We don't know (and we don't want to know) if the module is using a struct to store it's internal data or maybe something else. As its users the only thing we get is a simple instruction on how to work with that module.

Multiple Instance Module

The previously introduced single instance module has one drawback - at one time we can't use more than one. Sticking the analogy of our example I can't have an Long Player (LP, 12inch vinyl)  and a Singles (7inch) object at the same time. With the single instance module it is all one.

To keep separate lists of our vinyl we have to convert our RecordCollection module to an multiple instance module. For that purpose our interface looks like this:
// RecordCollection.h - Multiple Instance

#ifndef D_RecordCollection_H
#define D_RecordCollection_H

GHashTable* RecordCollection_Create(); 
void RecordCollection_Add( GHashTable* collection, 
                           const char* artist, 
                           const char* title ); 
void RecordCollection_PrintContainsArtist( GHashTable* collection, 
                                           const char* artist ); 
void RecordCollection_Destroy( GHashTable* collection ); 

#endif  /* D_RecordCollection_H */
On creation the constructor RecordCollection_Create() returns  a pointer to a GHashTable object somewhere in memory. The destructor RecordCollection_Destroy() in turn accepts a pointer to this object to free the memory occupied.

The remaining  two user functions have almost the same signature as their counterparts in the single instance example - except for the newly appended first argument which passes the current instance of our RecordCollection to the function.

To finish this section I'll give you this time a simple implementation of RecordCollection plus a client program using it. After the code example I finish the post with a discussion of the methodology presented, so bear with me.
// RecordCollection.c

#include <glib.h>
#include <stdio.h>
#include <stdlib.h>
#include "RecordCollection.h"

// declaration of private function inside module, 
// not visible in the interface (header)
static gboolean containsArtist( GHashTable* collection, 
                                const char* artist );

GHashTable* RecordCollection_Create() {
    GHashTable* collection = g_hash_table_new_full( g_str_hash,  
                                                    g_str_equal,
                                                    free,
                                                    free );
    return collection;
}

// Public Functions
void RecordCollection_Add( GHashTable* collection, 
                           const char* artist, 
                           const char* title ) {

    g_hash_table_insert( collection, 
                         g_strdup( artist ), 
                         g_strdup( title ) );
}

void RecordCollection_PrintContainsArtist( GHashTable* collection, 
                                           const char* artist ) {

    if ( containsArtist( collection, artist ) ) {
        printf( "Yepp, got it.\n" );
    }
    else {
        printf( "No, not found.\n" );
    }   
}

void RecordCollection_Destroy( GHashTable* collection ) {
    g_hash_table_destroy ( collection );
}

// Private Functions
static gboolean containsArtist( GHashTable* collection, 
                                const char* artist ) {

    return g_hash_table_contains( collection, artist );
}
// simple application of RecordCollection
// with multiple instances

#include <glib.h>
#include "RecordCollection.h"

int main() {
   GHashTable* myLPs = RecordCollection_Create();
   GHashTable* mySingles = RecordCollection_Create();

   RecordCollection_Add( myLPs, "Marvin Gaye", 
                                "What's Going On" );

   RecordCollection_Add( myLPs, "Baltic Fleet", 
                                "Towers" );

   RecordCollection_Add( mySingles, "Josh Rouse", 
                                    "Winter in the Hamptons" );

   RecordCollection_Add( mySingles, "Team 4", 
                                    "Ich zeig den Weg" );

   // Yepp 
   RecordCollection_PrintContainsArtist( myLPs, "Marvin Gaye");

   // No
   RecordCollection_PrintContainsArtist( myLPs, "Team 4");

   // Yepp
   RecordCollection_PrintContainsArtist( mySingles, "Team 4");

   RecordCollection_Destroy( myLPs );
   RecordCollection_Destroy( mySingles );
}

Discussion

The multiple instance module is as close as we got in terms of objects and object methods with plain C. To get a feeling how my RecordCollection might have looked like in Java, I've sketched out an interface and an example usage of the RecordCollection object, leaving out its implementation:
// possible interface defintion in Java

public interface RecordCollectionInterface
{
    void add( String artist, String name);
    void printContainsArist( String artist );
}
// creating and using the RecordCollection object in Java
// fortunately the garbage collector takes care of the destruction

RecordCollection myLPs = new RecordCollection();
myLPs.add("Marvin Gaye", "What's Going On");
myLPs.printContainsArtist("Marvin Gaye");
You can compare your self but in Java (or any other OO language) you can basically achieve the same functionality with less code - however, that's no news. I won't enter the performance discussion, though.

But still, for me the good news is, that there are ways to write C modules which come quite close to the behavior of objects and object methods in OO languages - of course leaving inheritance completely out.  I can accept the additional syntactical effort required. I mean, did you ever try to run Java on your Arduino?

Montag, 16. September 2013

Inserting "Spy" Code in Plain C With Link Time Substitution

I'm currently working my way through the very recommendable book Test Driven Development For Embedded C. Although I'm not applying the techniques in an embedded environment, most of the book is still valuable for general C programing.

While test driving coding one has often to spy on objects. Meaning, to call a method or function of a library which is usually not under our control but to verify the result of the function/ method call.  
An example would be a logging function provided by a third party library. You can't change the library but you still are interested in the result of your code ( the code to test) calling this logging function/ method with a certain string.

In Java this problem is resolved by employing the dependency inversion principle. The third party logging library is not directly used inside the code. Instead an interface is defined offering an own logging function.
Now two objects are implementing this interface. The first one is the  production object which is in our example probably just a wrapper for a call to the original logging library.
The second object is a spy object (officially called test double) which implements the same interface but offering additional methods like e.g. getLastLoggingMessage.
The original application code is changed to only work with an object of the type of the new interface - not the logging class directly.  With the additional details provided by the test object you can than continue writing your test logic. This methodology is called dependency injection

Interestingly enough, this technique is also possible in a pure C environment. To understand the whole approach I might write an other post in the future. Here, I want to demonstrate how the technical part of dependency injection could be done. In my opinion the most convenient way to achieve this in C is a method called link time substitution.

The idea is to let the compiler (well, the linker part of the compiler) pick your spy implementation instead of the original implementation.

But maybe one step backwards. Compiling C files takes place in two stages: 1) compiling (roughly transforming the C code to an object file) and 2) linking (copying the object code of the functions needed into the final binary). Link time substitution is happening in the second stage - at the linker level. But it is in my opinion not totally obvious how this is precisely working so let's have a little example here.
// program.c

#include "fav_music.h"

int main() {
   tellFavoriteMusic(); 
}
This is our main program which calls the function tellFavoriteMusic. As it can be seen this function is not implemented in the same file but is provided somewhere else. To tell the compiler about tellFavoriteMusic the header file fav_music.h is included.
// fav_music.h

void tellFavoriteMusic( void );
The header file contains only the functions signature. Now there are two ways interpreting what is happening here.

A C programmer would say, that the content of fav_music.h is simple inserted before anything happens in program.c. Since now the declaration of the function is inside the file before it's invocation in main, the compiler (first stage) is happy with the setup. This is called a forward declaration.
progam.c doesn't need to see the actual implementation of tellFavoriteMusic at this level. It is later up to the linker to figure that out.

A Java porgrammer would probably say that program.c is implementing the fav_music.h interface not knowing about it's exact implementation. Since the Test Driven Development principles are coming from an object oriented background (thinking of the good old Smalltalk days) I prefer in this context the latter, rather high level explanation.

As next step we create two implementations of tellFavoriteMusic in two separate files which will be eventually compiled into two distinct object files:
//fav_music_indie.c
 
#include <stdio.h>

void tellFavoriteMusic() {
    printf("I like Indie!!!\n");
}
//fav_music_soul.c
 
#include <stdio.h>

void tellFavoriteMusic() {
    printf("I like Soul!!!\n");
}
Generating the object files  for the three source files is straight forward:
$ gcc -c program.c fav_music_indie.c fav_music_soul.c 
$ ls *.o
fav_music_indie.o  fav_music_soul.o  program.o
So lets recap what we've done. We transformed (compiled) our three C files into object files. The compiler (first stage) did no bother with the double implementation of tellFavoriteMusic since at stage one it is only focused on the current source file.

Lets step to stage two - linking. program.o currently contains a reference which says "I need an implementation of tellFavoriteMusic to execute." It is the task of the linker to find this implementation in the available object and library files.
So lets start with the obvious approach and see what is happening:
$ gcc -o program.out fav_music_indie.o fav_music_soul.o program.o 
fav_music_soul.o: In function `tellFavoriteMusic':
fav_music_soul.c:(.text+0x0): multiple definition of `tellFavoriteMusic'
fav_music_indie.o:fav_music_indie.c:(.text+0x0): first defined here
collect2: ld gab 1 als Ende-Status zurück
Not surprisingly the linker is complaining about the double implementation of tellFavoriteMusic. The situation does not change by moving the object files into different positions on the command line.

To resolve this issue, we need to look at how the linker is proceeding. First of all, file order counts! So in the above example first fav_music_indie.o, then fav_music_soul.o and then program.o are processed. Secondly, a double implementation of a function in object files (as in our example) always gives an error since the linker does not know which one to choose.

But there is a trick: If one function is stuffed into a static library (.a file) the linker will first pick the implementation from the object file and will than fall back to the implementation offered inside the library - provided that still the object file stands first on the command line.

We have a little play with that and generate an archive next:
$ ar cr fav_music_soul_lib.a fav_music_soul.o
$ ls *.a
fav_music_soul_lib.a
We have now a library fav_music_soul_lib.a which contains our object file fav_music_soul.o and therefore provides an implementation of the function tellFavoriteMusic.
$ gcc -o program.out program.o fav_music_soul_lib.a 
$ ./program.out
I like Soul!!!
The linker could puzzle everything together and provided us we the expected result. Let's get prepared for the last step.
Again,  we offer the linker the second implementation of tellFavoriteMusic but this time we place our object files first and have the library as the last argument:
$ gcc -o program.out fav_music_indie.o program.o fav_music_soul_lib.a
$ ./program.out 
I like Indie!!!
Now it has done the trick: The licker first picked the implementation of tellFavoriteMusic from the object file. By the time the linker hit the archive fav_music_soul_lib.a the dependency to tellFavoriteMusic was already resolved so it ignored the implementation offered there.

Coming back to the beginning of this post, with this little trick dependency injection is also working quite nicely with plain C.

Donnerstag, 12. September 2013

False Alarm While Checking For Memory Leaks in GLib2 Hashmaps

After I finished a complex implementation using GLib2 hash tables the memory checker valgrind reported several memory leaks. Spending some time to track down the issue it all came down to the following supposingly problematic code:
int main() {
    GHashTable* item = g_hash_table_new_full( g_str_hash, g_str_equal, g_free, g_free );
    g_hash_table_insert( item, g_strdup("key") , g_strdup("value") );
    g_hash_table_destroy( item );
}
Valgrind complained about 1512 lost bytes:
valgrind --leak-check=full ./hash.out

==12624== Memcheck, a memory error detector
==12624== Copyright (C) 2002-2011, and GNU GPL'd, by Julian Seward et al.
==12624== Using Valgrind-3.7.0 and LibVEX; rerun with -h for copyright info
==12624== Command: ./hash.out
==12624== 
==12624== 
==12624== HEAP SUMMARY:
==12624==     in use at exit: 5,656 bytes in 12 blocks
==12624==   total heap usage: 17 allocs, 5 frees, 5,758 bytes allocated
==12624== 
==12624== 1,512 bytes in 3 blocks are possibly lost in loss record 9 of 10
==12624==    at 0x402A420: memalign (in /usr/lib/valgrind/vgpreload_memcheck-x86-linux.so)
==12624==    by 0x402A4DE: posix_memalign (in /usr/lib/valgrind/vgpreload_memcheck-x86-linux.so)
==12624==    by 0x40592E1: ??? (in /lib/i386-linux-gnu/libglib-2.0.so.0.3200.3)
==12624==    by 0x40A573F: g_slice_alloc (in /lib/i386-linux-gnu/libglib-2.0.so.0.3200.3)
==12624==    by 0x4079EB1: g_hash_table_new_full (in /lib/i386-linux-gnu/libglib-2.0.so.0.3200.3)
==12624==    by 0x804883D: main (in /home/xubuntu/projects/playing_with_glib2/hash.out)
==12624== 
==12624== LEAK SUMMARY:
==12624==    definitely lost: 0 bytes in 0 blocks
==12624==    indirectly lost: 0 bytes in 0 blocks
==12624==      possibly lost: 1,512 bytes in 3 blocks
==12624==    still reachable: 4,144 bytes in 9 blocks
==12624==         suppressed: 0 bytes in 0 blocks
==12624== Reachable blocks (those to which a pointer was found) are not shown.
==12624== To see them, rerun with: --leak-check=full --show-reachable=yes
==12624== 
==12624== For counts of detected and suppressed errors, rerun with: -v
==12624== ERROR SUMMARY: 1 errors from 1 contexts (suppressed: 0 from 0)

After intensive trying and eventually searching your favorite search engine it turned out, that newer (including mine) version of GLib2 are using by default a mechanism to allocate memory which leads to false alarms within valgrind, even if the hash table is destroyed correctly after usage.

To overcome this by setting the two environment variables G_SLICE and G_DEBUG before calling valgrind. Read more here and here.

With this test configuration valgrind is satisfied:
G_SLICE=always-malloc G_DEBUG=gc-friendly valgrind --leak-check=full ./hash.out 

==12671== Memcheck, a memory error detector
==12671== Copyright (C) 2002-2011, and GNU GPL'd, by Julian Seward et al.
==12671== Using Valgrind-3.7.0 and LibVEX; rerun with -h for copyright info
==12671== Command: ./hash.out
==12671== 
==12671== 
==12671== HEAP SUMMARY:
==12671==     in use at exit: 2,116 bytes in 5 blocks
==12671==   total heap usage: 11 allocs, 6 frees, 2,274 bytes allocated
==12671== 
==12671== LEAK SUMMARY:
==12671==    definitely lost: 0 bytes in 0 blocks
==12671==    indirectly lost: 0 bytes in 0 blocks
==12671==      possibly lost: 0 bytes in 0 blocks
==12671==    still reachable: 2,116 bytes in 5 blocks
==12671==         suppressed: 0 bytes in 0 blocks
==12671== Reachable blocks (those to which a pointer was found) are not shown.
==12671== To see them, rerun with: --leak-check=full --show-reachable=yes
==12671== 
==12671== For counts of detected and suppressed errors, rerun with: -v
==12671== ERROR SUMMARY: 0 errors from 0 contexts (suppressed: 0 from 0)

Dienstag, 10. September 2013

Initializing a Glib2 String Hash-Map

Glib2 is a big help while working with native C. I had some hard time using a key/ value hash map ( in GLib2 it is called "hashtable") for strings.
My naive, lazy appoach was this one:
// this outputs "NULL"
#include <glib.h> 

void testHashMap( const char* key, const char* value ) {

    GHashTable* test = g_hash_table_new( NULL, NULL );
    g_hash_table_insert ( test , g_strdup(key),  g_strdup(value) );

    char * result = g_hash_table_lookup( test,  "mykey" );

    printf("found %s\n", result );
}

int main() {
    testHashMap( "mykey", "myval");
}
As you can see I didn't really bother with the parameters of g_hash_table_new since I assumed that it would choose the correct hash function (first parameter) and the correct compare function (parameter two) automatically.

No, it doesn't. Reading the manual about the function it reveals that the NULL behaviour is all about working with pure pointers. To let the hash table work with strings as expected, the hash function g_str_hash and the compare function g_str_equal need to be supplied. 

This concludes in the following, now working code:
// this outputs "myval" as expected
#include <glib.h>

void testHashMap( const char* key, const char* value ) {

    GHashTable* test = g_hash_table_new( g_str_hash, g_str_equal );
    g_hash_table_insert ( test , g_strdup(key),  g_strdup(value) );

    char * result = g_hash_table_lookup( test,  "mykey" );

    printf("found %s\n", result );
}

int main() {
    testHashMap( "mykey", "myval");
}

Sonntag, 8. September 2013

Fazit "Software Sanierung" von Sebastian Kübeck - Teil 1c - Refactoring

Die umfangreiche Einführung des Buches "Software Sanierung" von Sebastian Kübeck muss sich natürlich auch dem Thema "Refactoring" widmen. Da ich mich in der Vergangenheit bereits intensiver mit Testgetriebener Entwicklung (TDD) beschäftigt habe, gab es in diesem Abschnitt kaum neues.

Eine Übersicht der behandelten Refactoring:
  • Umbenennen der Bezeichner (sprechende Namen für Variablen, Konstanten, Klassen...)
  • Methoden aus größerem Code-Block extrahieren
  • Methode auflösen, das Gegenteil von "extrahieren", Logik (nach Umorganisation) wieder in Ursprungsmethode zurück verschieben
  • Methode hochziehen - Verlangerung einer Methode von der Kinds- in die Elternklasse. Sinnvoll, wenn mehrere Kindsklassen die gleiche Methode nutzen.
  • Interface extrahieren - Erstellen eines neuen Interfaces und darauffolgend Ableiten der bestehenden Klasse von diesem Interface. Optional können auch Methoden der Klasse ins Interface wandern. Viele der Beispiele Im Buch beruhen auf dem Abhängigkeits-Inversions-Prinzip welches fordert, dass Klassen möglichst nicht von anderen Klassen sondern nur von deren Interfaces abhängig sein sollen. Dieses Refactoring spielt genau in dieser Liga.
  • Klasse extrahieren - aus einer Klasse eine Eltern-Klasse ableiten die optional auch Methoden  Implementierungen aus der Ursprungsklasse mitnehmen kann - ganz im Gegensatz zu Interfaces wo nur Deklarationen übernommen werden können. Letztendlich sind die beiden letzten Refactorings Alltag im Objekt-Orientierten Entwicklungsgeschäft.
Eine Gute Idee: Skizzieren von Refactorings
Da nicht immer am Anfang klar ist, was das günstigste Vorgehen ist, schlägt der Autor ein "Skizzieren" des  anstehenden Refaktorings vor: Außerhalb der Versionskontrolle können Source-Files umbenannt, umkopiert, neuangelegt werden. Es soll nicht kompilierfähiger Code herauskommen sondern eher eine Idee in welche Richtung das Refactoring getrieben werden soll.

Dienstag, 3. September 2013

Native character strings with Oracle Pro*C and C

There are times where you can't get get around the Oracle Pro*C precompiler. It allows you to access a Oracle database from within your C programs. However, having seen things like JDBC in Java, Pro*C is technology from a past century.
Yes, it's not directly a friendship between me and the precompiler. If you're allowed to introduce a third-party open source library, I highly recommend OCILIB for working with your Oracle database. It allows a more intuitive and C native way (without precompiling) to access the data.

Coming back to Pro*C. All code I came across was handling character strings with the Oracle supplied VARCHAR struct. This struct contains the actual data (data field) and it's length (len field). Before using the string one has to NULL-terminated manually like in this example:
EXEC SQL BEGIN DECLARE SECTION;
VARCHAR string1[20];
VARCHAR string2[20];
EXEC SQL END DECLARE SECTION;

EXEC SQL DECLARE c cursor FOR
SELECT 'a test',
       ' an other test ' 
FROM dual;

EXEC SQL OPEN c;
EXEC SQL WHENEVER NOT FOUND DO break;

for (;;) {
    EXEC SQL FETCH c INTO :string1, :string2;

    // manually adding NULL to terminate string
    string1.arr[string1.len] = '\0';
    string2.arr[string2.len] = '\0';

    printf("..%s..\n", string1.arr);
    printf("..%s..\n", string2.arr);
}
EXEC SQL CLOSE c; 

After spending some hours with the Pro*C developers guide I discovered a more C like way to accomplish the same thing. Basically, it uses a new character map "STRING" which is either set as precompiler option or set inline like in the following example:
// either as precompiler option or inline in the code
EXEC ORACLE OPTION (CHAR_MAP=STRING);

EXEC SQL BEGIN DECLARE SECTION;
char *string1[20];
char *string2[20];
EXEC SQL END DECLARE SECTION;

EXEC SQL DECLARE c cursor FOR
SELECT 'a test',
       ' an other test ' 
FROM dual;

EXEC SQL OPEN c;
EXEC SQL WHENEVER NOT FOUND DO break;

for (;;) {
    EXEC SQL FETCH c INTO :string1, :string2;
    printf("..%s..\n", string1);
    printf("..%s..\n", string2);
}
EXEC SQL CLOSE c;
Both examples do the same thing, the last one reliefs you from dealing with NULL termination of strings yourself.


Freitag, 30. August 2013

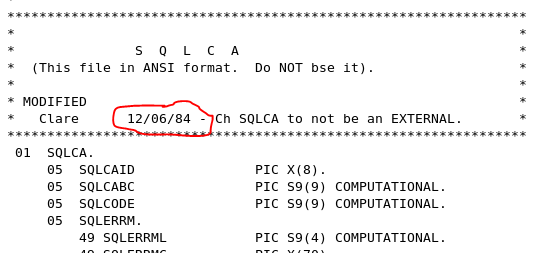
Cobol in 1984


I was just browsing through the Oracle C/C++ precompiler files which come with the standard database installation. In the header directory there is a file named "sqlca.cob" which is obviously some kind of COBOL prototypes or however it is called in "their" world.


The reason why I want that to share this with you is the date stamp in the file's header (12/06/84).  Looking at the pace of how technology comes and goes these days it's just nice to see that apparently the host people are not impressed by that at all. Would be interesting if Clare is still with Oracle ;-)

Freitag, 23. August 2013

Fazit "Software Sanierung" von Sebastian Kübeck - Teil 1b, Entwurfsmuster

Der erste Teil des Buches "Software Sanierung" von Sebastian Kübeck beinhaltet eine umfangreiche Auswahl von Gang-Of-Four Entwurfsmustern inklusive guter Code-Beispiele. Die gewählten Patterns sind nach Ansicht des Autors "für das Sanieren" sinnvoll.

Nachdem ich auf meiner letzten Reise (nicht Urlaub) das Orginal-Gang-Of-Four Buch brav neben dem Bett liegen hatte, in der Hoffnung, dass sich Erkenntnisse daraus automatisch im Schlaf in Richtung meines Gehirns bewegen, habe ich hier die Chance ergriffen und die vorgestellten Muster im klassichen Schulprinzip durchgearbeitet. Dies sind meine Hefter-Notizen:

Abstrakte Fabrik
Klassisch wird ein Objekt mit "new" erzeugt. Eine Abstrakte Fabrik ist eine Klasse oder Interface, die mindestens eine Methode hat, die ein Objekt erzeugt.

Schablonenmethode/ Template Method
Ein Algorithmus wird in einer abstrakten Klasse definiert, wobei die Implementierung von Algorithmus-Details an Unterklassen ausgelagert wird. Zusätzlich kann die abstrakte Klasse auch noch leere Zwischenschrittsmethoden haben, die in Unterklassen optional implemenitert werden können.

Wert-Objekt
"Ein Wertobjekt ist dadurch gekennzeichnet, dass seine Identität von den Werten bestimmt wird aus denen es aufgebaut ist." Es hat keine eigene Identität. Im Buch wird noch darauf verwiesen, dass ein Kennzeichen von Java-Wertobjekten die Implementierung der Methoden "hashCode" und "equals" sind durch die der Programmierer einen Mechanismus zum Inhalts-Vergleich anbietet.
Ein Wertobjekt ist nach seiner Erstellung nicht mehr veränderbar (immutable).

Das Wert-Objekt ist nicht zu verwechseln mit dem auch in Javascript sehr populären "Data Transfer Objekt".

Null-Objekt
"Provide an object as a surrogate for the lack of an object of a given type. The Null Object Pattern provides intelligent do nothing behavior, hiding the details from its collaborators."
Im Buch wird ein Beispiel angeführt wo, abhängig von einem Konstruktor-Parameter, eine Ausgabe auf OutputStream-Objekt erfolgen soll - oder, wenn der Parameter "null" ist, anstelle dessen die Ausgabe über die Null-Objekt Implementierung von OutputStream.

Stellvertreter (Proxy)
Ein Objekt welches seine Methodenaufrufe an sein Orginal-Objekt weiterleitet. Stellvertreter und Orginal implementieren das gleiche Interface. Zusätzlich erfolgen aber noch weiter Aktionen im Stellvertreter die im Orginal nicht erfolgen.
Beispiel ist das Anklemmen von Logging. Dem Orginal-Objekt fehlt das Logging, der Stellvertreter besitzt die gleiche Signatur wie das Orginal, leitet die Methodenaufrufe auch an das Orginal weiter - aber loggt noch zusätzlich.

Adapter
Wie "Stellvertreter" allerdings underscheiden sich Methodensignatur von Orginal und Adapter Objekt. Dient als Verbindungsstück zwischen zwei verschiedenen Interfaces.

Beobachter
Häufig genutzt für Event-Handling in einer GUI. Die Beispiele im Buch haben aber eine andere Ausrichtung: Einem zu beobachtenten Objekt wird z.B. im Konstruktor ein Beobachter-Objekt übergeben. Dieser Beobachter könnte z.B. ein Logging implementieren.
An geeigneter Stelle werden dann im Orginal-Objekt die Beobachter-Methoden aufgerufen die dann z.B. zu einem Log-Eintrag führen.

Das Pattern ist praktisch für das testbar-machen von Log-Einträgen: Es gibt für das Beobachter-Objekt eine Produktiv-Implementierung, die einfach auf STDOUT schreibt und eine Test-Implementierung die sich zusätzlich das geloggte im Objekt merkt. Ein Unittest kann dann das "gemerkte" (z.B. eine Liste) vergleichen.
Dem zu beobachtenden Objekt (das mit der Fachlogik) wird dann der jeweilig passende Beobachter übergeben.

Fascade
Gang-of-Four Definition: "Biete eine einheitliche Schnittstelle zu einer Menge von Schnittstellen eines Subsystems. Die Fassadenklasse definiert eine abstrakte Schnittstelle, welche die Verwendung des Subsystems vereinfacht." (Erich Gamma, Richard Helm, Ralph Johnson, John Vlissides: "Entwurfsmuster. Elemente wiederverwendbarer objektorientierter Software". Addison-Wesley. 1. Auflage 1996, S. 212)

Kommando
Kapsselung von Befehlen in ein Objekt. Im Buch wird ein Beispiel für einen einfachen Dateimanager gebracht. Die Hauptklasse (der FileManager) empfängt die Befehle als Arguments und ruft dann das entsprechende Kommando-Objekt auf. Die konkreten Aktionen zu einem Befehl sind im Objekt gekapselt.
Eine Erweiterung des Programmes ist einfach, es wird ein neues Kommando-Objekt angelegt (und getestet), dann wird der Hauptklasse noch das neue Objekt bekannt gegeben.

Strategie
Ein alter Bekannter im neuen Kleid, auch eine Anwendung des Abhängigkeits-Inversionsprinzips. Die Idee ist, Algorithmen die einer häufigen Änderung unterliegen via Interface zu implementieren.  und damit einfacher ausstauschbar zu machen.

Das Buch führt als Beispiel einen einfachen Passwort-Authenticator an. Die Passwort-Policy ist veränderlichen organisatorischen Regeln ausgesetzt - aus diesem Grund wird sie mittels Strategy-Pattern implementiert.
Konkret gibt es ein "PasswordPolicy" Interface welches nur die Methode "isSecure()" beinhaltet. Da die Frage "isSecure()" organisatorischen Änderungen unterworfen ist, wird die konkrete Implementierung von "PasswordPolicy" regelmäßig angepasst in dem eine neue Klasse geschrieben wird.
Die Authenticator-Hauptklasse bekommt im Konstruktor nur die jeweilig aktuelle Implementierung der Policy übergeben.

Mittwoch, 21. August 2013

Fazit "Software Sanierung" von Sebastian Kübeck - Teil 1a, Einführung und Design Prinzipien

Ohne konkrete Zahlen herauszukramen, stelle ich hier die Behauptung auf, dass ein Software Entwickler in seinem Berufsleben viel mehr mit existierendem Code arbeitet als dass er regelmäßig die berühmte "Grüne Wiese" bestellt.
 Dem Pragmatismus der Pragmatic Programmers folgend, versuche ich aus diesem Fakt eine Tugend zu machen, mit dem Ziel "Master Of Legacy Code" zu werden. Und ganz ehrlich, sich einen fremden, alten, nicht Unit-getesteten Code zu eigen machen - das ist doch im Grunde herausfordernder als immer nur ein neues Town House auf die planierte Fläche zu setzen.

Dieser Logik folgend stürzte ich mich neulich enthusiastisch auf das Buch "Software Sanierung" von Sebastian Kübeck, erschienen  2009 im mitp-Verlag. Um es vorweg zu nehmen: hiermit gestehe ich, dass in der Vergangenheit meine Unit-Tests häufig eher externe Tests waren.

Der erste Teil des Buches ist ein Crash-Kurs im benötigten Handwerkszeug:

  • Objektorientierung
  • Tests inklusive Abgrenzung der verschiedenen Test-Arten
  • Wichtige Design Patterns
  • Refactoring Patterns
  • Fehlerbehandlung (Exceptions)

Da dieses Blog mein öffentliches Gehirn sein soll, hier die Liste der Dinge, die ich als wichtig in diesem ersten Teil empfand:

Natürliche versus Künstliche Komplexität
Die natürliche Komplexität beschreibt letztendlich die Grund-Komplexität des implementierten Fachprozesses. "Der kleinstmögliche Umfang an Informationen, die notwendig sind um [ eine Problemstellung ] vollständig zu beschreiben, definiert die natürliche Komplexität des Problems."


Die natürliche Komplexität lässt sich nur verringern in dem man Features aus einer Anwendung wieder ausbaut und sie damit wieder vereinfacht.

Nun zur künstlichen Komplexität: "...der Ballast .., der nötig ist um Programme unter den gegebenen Rahmenbedingungen und mit den Kenntnissen der Programmierer zu realisieren."

Die künstliche Komplexität kann man direkt verringern, zum Beispiel durch gutes Design, Hochsprachen oder die Verwendung von Bibliotheken anstelle von eigenen Implementierungen. Ein guter Entwickler erhöht also bei einer Programmerweiterung die künstliche Komplexität nur um das wirklich notwendige Minimum - so weit zumindest die Theorie.

Sanieren statt Wegreißen
In der Einleitung werden ein paar gute Argumente für eine Sanierung bestehender Software angeführt, besonders wichtig finde ich diesen hier (in eigenen Worten):
Häufig ist die Software selbst die einzig verbliebene, aktuelle Spezifikation des Fachprozesses. Wissensträger sind teilweise nicht mehr verfügbar, die existierende Dokumentation ist lückenhaft. Allein das Programm beinhaltet das gesammelte Wissen der letzten x Jahre/ Jahrzehnte.

UML Klassendiagramme sind zwar schick aber...
...spiegeln nicht die Interaktion der Objekte wieder. Außerdem entsteht kein Programm aus einer Klassen/ Objekt-Beschreibung. Das scheint wohl noch aus der Zeit zu kommen, wo man Klassendiagramm gemalt hat und sich dann den Code per Knopfdruck generiert hat. 
Viel näher am Software-Entwicklungsprozess sind die Interaktionsdiagramme die erst später in die UML aufgenommen wurden. Das Nützlichste aus meiner Sicht ist das Kommunikationsdiagramm - letztendlich eine Formalisierung der Kästchen mit Pfeilen die man sowieso gern zur Visualisierung verwendet.

Interface-Aufteilungsprinzip
"Interfaces sollten nur so viele Methoden haben, wie für die Ausführung einer Aufgabe unbedingt nötig sind. Können zusätzliche Methoden zur Verfügung gestellt werden, sollte man das Interface aufteilen."

Liskov Substituitions-Prinzip
"If it looks like a duck, quacks like a duck, but needs batteries – you probably have the wrong abstraction" (Link)

Das Web ist voll mit Erklärungen dieses Prinzips.Grundsätzlich soll jede Erweiterung einer Klasse die Elternklasse vollständig ersetzen.

"Der Nachteil der Verletzung des Liskov-Substitutionsprinzips liegt in der Erwartungshaltung an eine Erweiterung einer Klasse. Da man dank der Polymorphie unter Umständen nur it der Elternklasse arbeitet, ohne zu wissen, dass man es eigentlich mit einer Ableitung zu tun hat, ist es äußerst unangenehm, wenn sich diese Klasse ganz anders verhält als die Elternklasse."

Für mich wird dieses Prinzip durch ein Beispiel am besten deutlich. Robert Martin hat dies sinngemäß einmal so erklärt: Mathematisch ist ein "Quadrat" ein "Rechteck". Man ist also versucht auch eine Klasse "Quadrat" von einer Basisklasse "Rechteck" abzuleiten.
Die Methoden "setX()"und "setY()" machen bei einem Rechteck durchaus Sinn - beim einem Quadrat allerdings nicht wirklich. Hier setzt der Aufruf einer Methode alle vier Seiten. Die Abstraktion "ein Quadrat ist ein Rechteck" passt hier also unter objektorientierter Betrachtungsweise schlecht.

Abhängigkeits-Inversionsprinzip
Auf diesem Prinzip bauen fast alle Refactorings des Buches auf. Es sagt aus, "dass Klassen möglichst nicht von konkreten Implementierungen anderer Klassen, sondern von deren Interfaces abhängig sein sollen".
In der Praxis bietet es sich an eine starre Kopplung z.B. an die JDBC-Klassen durch ein eigenes Interface aufzulösen, Die Produktionsimplementierung des Interfaces ist letztendlich ein Wrapper (ja, ich weiss, es heißt "Delegation") um die JDBC-Klassen.
Die Testimplementierung nutzt das gleiche Interface, emuliert aber Aktionen wie "getLastName()" mittels Hashmap.

Wenn nun der Ursprungsklasse während der Laufzeit eine andere Datenbank-Klasse mittels z.B. "setDatabase()" Methode "injiziert" wird, spricht man von "Dependency Injection".

Änderungsvektoren (einer Klasse)
Im Laufe der Zeit wird häufig eine Klasse durch verschiedene Änderungswünsche (Anforderungen) in verschiedene Richtungen getrieben. Diese verschiedenen Richtungen nennt man Änderungsvektoren.

Single-Responsibility Principle
Eine Klasse sollte nur einen dieser Vektoren implementieren. Also z.B. sich nur um Datenbankaktionen kümmern und keine Berechnungen durchführen.

Das Gleiche gilt für Methoden: checkAndStoreData() wird besser zu "checkData()" und "storeData()". Dieses Prinzip ist universell und gilt genauso für C Dateien und Funktionen.